Friday, February 22, 2013

Redefining the Ladies' Boudoir with Ikea

The alternate title to this post was "Frenching My Dresser."

My Ikea Malm series dresser has been feeling a little neglected, as it watches other furniture in my room get makeovers, so of course I thought my next project had to be transforming this modular piece into the ultimate 18th century ladies' boudoir.

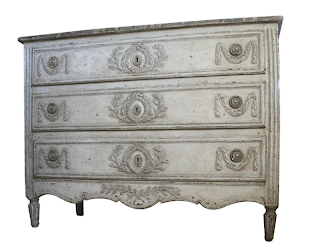
For inspiration, I found this gorgeous 18th century French dresser from 1stdibs.com, which is like Temptation Island for people who like the 18th century.

Unfortunately, restored French furniture from 250 years ago is probably out of the price range of, say, your average freelance writer.

So, instead, here's the idea. This clever Pinterester restored a drab dresser with spray paint and lace:
My Malm dresser may not have fancy swirly legs and accents, but it still deserves to feel 18th century-fabulous.

For this project, you will need:

  • paint primer (I use Glidden's)
  • 2 paint colors: a pale one for the undertone, and a darker one for the lace drawer fronts (I just find some interior paints I like at Home Depot and ask them to make me up some sample paint pots; they cost less than $3 each and are perfect for smaller projects)
  • a disposable spray can dispenser (this was $4 at Home Depot, and preferable because you can use any color with it; ready-made spray paints tend to come in a fixed selection of colors)
  • pieces of lace large enough to cover the front of your drawers (I have two sizes of drawer, so I measured each and bought a yard of cheap-o lace fabric at Jo-Ann Fabrics and used the same two pieces of lace for all six drawers)
  • painter's tape to tape the lace down (this is nice because it won't leave sticky stuff on your drawers)
  • a cup of tea, preferably Lady Grey tea, since we are all ladies here

First, empty your drawers of all your ladies' things, aka bras from Target, and pull out the drawers from the dresser. Sand and prime the body of the dresser and the drawer fronts. Depending on your preferences and type of dresser, you may also want to paint the sides and insides of the drawers; the drawer fronts on my dresser stick out beyond the actual dimensions of the drawer, so it wasn't necessary for me.

After the primer dries, paint the dresser and drawer fronts in your lighter undertone color (it's hard to see in this light but I chose a very pale mint green). You should let this dry for a couple of hours, so while that dries, you can do some other thing, like watch Property Brothers on HGTV or pet a cat.

Once everything is dry, take your lace and lay it over one of the drawer fronts; measure and cut enough to wrap around the drawer front and tape underneath so you get a nice, flat surface for the paint to take on the stencil:

Grab your disposable spray can and follow the instructions to dilute the darker paint you chose, enough to go through the spray nozzle. The guy at Home Depot told me that for most interior paints, it's fine to dilute them with a little water; only oil-based paints require actual paint thinner. I used about a capful of water per 2 oz. of paint, but I really just eye-balled it:

Holding the spray can about 6-8 inches away from the surface of the drawers, spray your paint over the lace covering. It's important to keep your hand moving as you spray so you get even color; if you hold your hand in one place, you're likely to get a blob of paint that looks uneven with the rest of the surface. Spray until you get the drawer to the desired color.

Because the paint layer is so thin, these dry pretty quick, but even so, let them sit at least a half hour to an hour before carefully untaping the lace and peeling it back. But when you do...


Gorgeous!! Shabby-chic 18th century glam!! Who knew Malm had it in her?

You can sand the edges a bit if you want your piece to look a little more shabby-chic, or if you love it as is, just put the drawers back and admire how crafty and mod-18th century you are.


Put your ladies' things back in your lovely new boudoir, make yourself another cup of tea, and settle back to revel in the best modern girl's 18th century bedroom piece.

Monday, February 18, 2013

Some Petite Projects for Presidents Day


Happy Presidents Day!  I just got back from a weekend in D.C. with my mom and sister. My favorite president is John Adams, but mostly because he was just an awesome New Englander, and his wife, Abigail, told him to "remember the ladies" when building this new republic.

Still planning some larger projects, but here are a few little ones I did over the past week:
 I recycled this spaghetti sauce jar into a tea light holder with a layer of salt on the bottom, topped with jumbled stones and glass beads.


I was tired of all of these silver WalMart frames and gave them a little perk up with my paints.

My roommate found this Rococo-style scrapbook paper at Michael's and it looks perfectly darling behind this frame I got years ago from a dollar store.

I un-blahed this WalMart lamp that was originally dark brown and red.

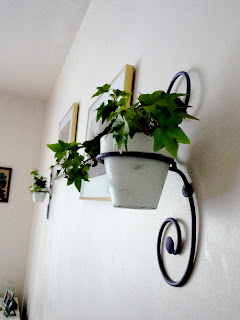
I also decided I needed some more indoor 18th century garden in my life, so I found these sweet, swirly wall planters on Amazon and painted and distressed them before adding painted terra cotta pots planted with ivy:


These came out so sweet and pretty-looking I felt like an industrious colonial housewife, living off the land in proud independence. Except I had help from Amazon.com. And Home Depot. Well, okay, so maybe I feel more like an 18th century mod girl but that's just as good! Happy Presidents Day!

Tuesday, February 12, 2013

18th Century Noms

Morning, bloggers! I have some projects coming up, hopefully later this week, but while I'm in the planning stages I'm straying from the Shabby-Chic world into one of the other best aspects of the 18th century...FOOD.

The Colonial Williamsburg Foundation, of which of course I'm a member*, has developed this great blog of some of the choicest recipes from the 18th century and basically I want to nom nom nom all of them. Especialy the Loafes, Spanish Fashion. Chocolate cream in fried carbs? Those Spaniards knew what they were doing.
Eerrrmaahgaaadd deliciousness. Pic courtesy of the Colonial Williamsburg history blog.
I haven't had breakfast yet today so obviously I went right for the desserts page. Happy 18th century cooking, and see you soon!

*I have a plastic card that reads "Founding Member Since 2006."

Saturday, February 9, 2013

Fripperies and Such

I have a goal these days, of replacing my $2 tarnished jewelry collection with timeless, quality pieces that don't turn your skin green.

So this project that my roommate found for me on Pinterest was the perfect motivation to make something that would encourage me to showcase some nicer fripperies.  Essentially, this Pinterester's idea is to take picture frames, coat hangers, or even tree branches, and turn them into unique and elegant jewelry holders.

What could be better for the modern girl yearning for more 18th century-style in her life than this darling antiquated frame-turned-frippery display?  Yes, please!

So, to do this project, you need:
  • an open frame (aka without glass), in any shape you like
  • paint, if you want to paint your frame
  • several lengths of lace
  • a glue gun, or quality glue that can withstand some pressure (since jewelry will be hanging off it)

I had the lady at the fabric counter of Hobby Lobby help me with lace.  I picked out the frame I wanted and then we found some sturdy bolts of lace that looked like they could withstand another Revolution, and measured them against the frame.  I think one was made of embroidery floss, and the other had reinforced ribbon running through it.

I'd already bought my paint at Home Depot, and I had a glue gun at home, so I was ready to craft!

I picked a sweet, swirly frame that I found at Hobby Lobby, which reminded me of something you'd see hanging out in Marie Antoinette's bedroom, pre-decapitation times.


I painted the frame in Sea Glass Green, which is kind of minty-colored but still soft and bright.  Note: apparently it's pretty easy for whatever you're painting to stick whatever surface you're painting on.  So unless you enjoy having a pretty close relationship with your flat-head screwdriver and your sanding block, I recommend finding something, like pushpins or something, to elevate the frame off of the scrap paper.

After prizing the frame from the sheets of my college alumni magazine, I used my trusty pink glue gun to glue down the strips of lace I had measured earlier. The surface of the glue dries pretty quickly but you'll want to still let it sit for several hours so it's totally solidified.

And that's it! Super-easy 18th century frippery glam. Just hook or string your baubles into or around the lace and you have an instant jewelry-holder and a pretty wall-piece.


By the way, the ornate style of the frame is often called 'Rococo' and was most popular through the end of the 18th century, though it dates back much earlier.  And now it's popular again as an element of Shabby-Chic style.  Like Sybil Crawley's mod harem pants in Downton Abbey, 18th glam will always have a place in the world.

Monday, February 4, 2013

The Mod Librarian Bookshelf

Every girl needs a shrine to her personal book collection. Or your collection of anything, really. But anyway, here's my first attempt to eighteenth century mod-out my bookshelf.

My bookshelf is from Target. It's fine. I'm not knocking Target furniture. In fact, like thrift shop furniture it's ideal for this kind of project, because if you mess up, eh! Jane would tell you to get over it.


To paint and distress this piece of furniture, I just Googled, like people do, and found this great website with very clear detailed instructions. So I won't bore you by repeating them. Anyway, the lady on that website was super helpful so thanks Shabby Chic Guru Lady! You've earned a Lizzie* Badge, which is an honor I made up just now.

Note that I sanded the whole piece before priming, but sanding the back inner wall and the flat tops to the shelves was really a social courtesy, as I don't think those pieces are made of real wood, and therefore they didn't really scuff up. But it was fine and the primer stuck without a problem, so even cheap-o furniture can be transformed!

After priming, I had to wait a bit, which is terribly hard for a Gemini, so I painted that little basket on the right as well. Then it was time to paint.

This is how the bookshelf looked after one coat of primer and one coat of paint, and I actually thought it was rather perfect. I liked that the brush strokes were a bit uneven (and that's a win for having no painting skills!) and let through some of the darker undertone of the original color, giving it that Provençal farmhouse, drinking-tea-while-playing-the-spinnet-look I was going for.

In fact, after stepping back and looking at it, I decided I only needed a little bit of distressing to finish it off, so I took my handy medium-grain sanding block and just scuffed up the edges and the corners.
Ta da! I realize that you can't see the distressing too well, but I will try to get a better pic when the light is better in my room and I can get all close and personal. This newly distressed piece is going in the corner of my room by my desk, and I'm tying it in with my favorite shades of mint green and robin's egg blue. But don't forget to add the books–they're what make the mod librarian the most mod.


*After Elizabeth Bennet. Obviously.

Mod yourself out, eighteenth century-style

It's shabby chic.

It's the eighteenth century.

It's The Eighteenth Century Guide To Modern Living!  Over two hundred years later, the inventions, the ideas and the style of the Enlightenment are still the top guide for the modern girl.

Jane Austen would take this blog and live in it in a penthouse apartment in Manhattan. Fanny Burney would curl up with this blog on a restored, distressed wooden bench swing on the back porch of a Georgian farmhouse. Sam Richardson would patronizingly laud our female attempt at accomplishment but booo we don't want him! Only nice boys allowed here!

So. Here I am, finally converting my old blog and longstanding college thesis of the same title, into something new, fresh, and totally me for 2013. I don't know why I didn't see this fab connection between shabby chic, my favorite style, and the eighteenth century, before, but sometimes the love we have been looking for has been right in front of us, all along.

If you like Walmart piggy banks being given a new sense of purpose in a troubling world, or empathize with the typical fate of Ikea furniture, then this is the blog for you! I'm so excited to share with you my Pinterest obsessions, my own random ideas for decor, design, delectable yummies, and my adventure in making the eighteenth century a girl's modern guide to life.